Wednesday, March 9, 2011

"Leftover" Mini Lasagnas


Due to the awful weather we're having in Athens and being trapped inside the house, I decided to put my time (and leftover ingredients!) to good use. Yesterday I made Mushroom, Spinach and Arugula Raviolis and had quite a few leftover wonton wrappers, as well as the mushroom/greens/cheese filling for the raviolis. So I threw these things together with some other ingredients and made mini lasagnas!

Idea adapted from Can You Stay for Dinner?


What you'll need:


For the Lasagnas:
  • 12 oz raw ground meat of your choice (I used ground venison) 
  • 1 cup chopped onion
  • 1 jar of your favorite pasta sauce
  • dried oregano
  • dried basil
  • 1 ½ cups leftover ravioli filling OR part skim ricotta cheese, if you aren't working with leftover ingredients
  • 1 package square wonton wrappers
  • 1 1/2 cups shredded mozzarella cheese
  • salt&pepper

What to do:


Preheat oven to 375ºF. In a large skillet over medium heat, brown the meat with the onions, and season with salt and pepper to taste. Add the jar of pasta sauce to the meat, bring to a gentle boil, and reduce heat to a low simmer. Simmer for about 10 minutes. Set aside.

Spray a cupcake pan with non-stick spray. Then, place a wonton wrapper inside each of the cups, pressing firmly on the bottom and sides. Using a tablespoon, spoon a scoop of the filling (or ricotta) into each of the cups.

Now spoon a scoop of the meat/onion/sauce mixture into each cup. Sprinkle with mozzarella cheese. Repeat this process, and then cover the top with another wonton wrapper (you will have 3 in each cup). Spoon a bit of sauce over the top (no filling or ricotta this time) and top with mozzarella cheese.


Bake the lasagnas at 375ºF for about 10 minutes, or until the cheese has melted.


Let the cups cool, and then carefully remove the lasagnas from the cupcake pan using a spoon. Sprinkle with basil and oregano to serve!


This one was SO easy and delicious, I definitely recommend trying it out!

Tuesday, March 8, 2011

Mushroom, Arugula and Spinach Ravioli in a Parmesan "Cream" Sauce


Tonight I tried my hand at making ravioli for the first time! And right off the bat I'll tell you- I didn't make the pasta. I know I know... I bring shame to my Italian family. But trust me, these were enough work even with the pre-made pasta. So if you've got some time to kill, or a couple midterms you want to avoid studying for (points to self) give these a go!

As for the recipe, I adapted recipes from Cooking Light Magazine and Giada De Laurentiis to sort of create my own. So many ravioli recipes call for heavy cream in the sauces, which pains me to use in any of my cooking since it's basically obesity in a bottle. So I tried to lighten things up with a faux-cream sauce, and it turned out just as tasty as the real thing!


the ingredients
Things you'll need:

For the sauce:

  • 1 cup low-fat milk
  • 2 tablespoon all-purpose flour
  • 1/4 cup fresh grated Parmesan cheese
  • 2 tablespoons of Spinach/Mushroom mixture
  • salt and pepper to taste
**You'll make the spinach/mushroom mixture for the raviolis, but save a bit for the sauce. It adds a nice touch.

For the Ravioli:
  • 1 package wonton wrappers
  • 1 package fresh spinach
  • 1 package fresh arugula
  • 8 oz baby portobello mushrooms
  • 1/3 cup grated Parmesan cheese
  • 1/3 cup part-skim ricotta cheese
  • 1 large egg, beaten with 1/2 tsp water
  • olive oil
  • salt and pepper to taste
What to do:
 
For the Ravioli:

In a large skillet, sauté the mushrooms in olive oil over medium heat for about 6 minutes. Season with salt and pepper. Add in the arugula and spinach, cover with a lid, and allow the greens to wilt. Once wilted, add the mushroom/greens mixture to a food processor and pulse until a course mixture is formed. If you don't have a food processor, a blender should work just fine.

The mushrooms and greens are ready for the food processor when they look something like this.

Empty the mixture from the food processor into a medium bowl, and combine with the ricotta and the grated Parmesan. Mix thoroughly and set aside until you are ready to fill your raviolis.

Ravioli filling
Now you are ready to fill your raviolis! Lay out wonton wrappers on a plate/surface and brush each one of them with the egg wash. Using a tablespoon, spoon a scoop of the mushroom/greens mixture into the middle of each wonton wrapper. Save about 2 tablespoons of your mixture, you'll need it for the sauce.


Next, place another wrapper on top of each open ravioli. Make sure no air bubbles are in your raviolis- this will cause problems later (trust me!). 


Seal the edges of the ravioli with a fork, and place them on a floured baking sheet. Cover with a towel so they don't dry out. 

In a large pot, boil the raviolis (3-4 at a time) for 2-3 minutes. Remove from pot with a slotted spoon. Repeat the process until all your raviolis are done, and then add the sauce to them!

To make the sauce, heat the milk and the flour over medium-low heat in a small saucepan, stirring constantly with a whisk. Remove from heat, and add the Parmesan cheese, salt and pepper, and remaining spinach/greens mixture. Stir, and add to ravioli. Garnish ravioli with some chopped arugula and additional grated Parmesan cheese.

Final Product!


Monday, March 7, 2011

Slow Roasted Salmon with Strawberry Salsa


Since this is my first real blog entry, I'm going all out on it. I took pictures throughout the entire cooking process to make it easier if you'd like to recreate the recipe, but it was so tedious and time consuming! Future entries may not be quite as detailed with so many photos, but we'll see how it goes. Any feedback on preferences would be greatly appreciated! Anyways, back to the food. I made this for dinner tonight, and I'm just going to tell you: it was the most tender salmon I've ever had in my life. Shout-out to Simply Gluten-Free for the awesome advice on slow-roasting the salmon.  Keep in mind that the recipe serves four but I'm only cooking for one, so my pictures won't quite match up.

the ingredients

Things you'll need:

For the Salmon:
  • 4 Salmon fillets
  • 2 lemons, zested
  • 1 onion
  • olive oil
  • dill weed
  • kosher salt and pepper, to taste

For the Strawberry Salsa:
  • 2 cups fresh strawberries, rinsed, hulled and diced
  • 1 cup cherry tomatoes, quartered (I didn't have cherry tomatoes, so I used a beefsteak tomato)
  • 4 scallions, white and green portions, sliced thin (once again, I didn't have these. So I used a white onion)
  • 1 tsp. fresh parsley, minced
  • 1 tbsp. balsamic vinegar
  • 1 tsp. fresh lemon juice
  • Drizzle of olive oil
  • Drizzle of honey
  • Salt and pepper, to taste
What to do:

For the Strawberry Salsa:
Salsa in the process
To make the strawberry salsa, dice the tomato, strawberries, and onion. Toss them in a medium bowl, and add all of the remaining ingredients to it. Mix ingredients thoroughly and put it in the fridge until your salmon is ready. Easy as that!

For the Salmon:


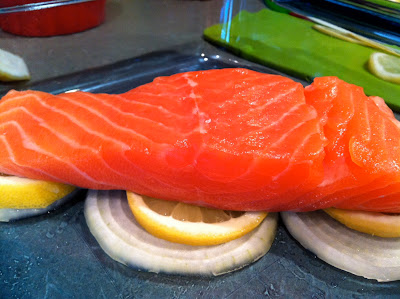
Slice the lemons after you have zested them (save the zest- you'll use it later), and slice the onion as well. In a baking dish, layer half of the onions and lemon slices. Place the salmon fillets on top, and then drizzle the salmon with olive oil and lemon juice. Season the fillets with salt, pepper, and dill. Sprinkle the lemon zest over the fillets. Top the salmon with the remaining lemon slices and onion.

When you put the salmon in the oven, it should look something like this

Bake the salmon at 250 degrees F for thirty minutes. The salmon is done when a sharp knife goes in and out of the thickest part of the fish easily.

When the salmon comes out of the oven, it should look something like this
Remove the salmon from the baking dish, leaving the onion and lemon slices behind. Top with strawberry salsa and serve! You may want to squeeze some additional lemon juice over the entire dish for a bit more acidity.

final product!
Enjoy!

By popular demand, I bring you... a food blog!


I finally decided to move on up from the Facebook album to an actual blog! Now I'll be able to show you guys how to make everything rather than just giving you a picture and leaving you in the dark. For now, I'm just going to post some pictures of things I've made in the past. If you see something that strikes your interest and you'd like to know how to make it, let me know! I'll do a follow-up post with the recipe, step-by-step directions, and a photos-galore. I hope you all enjoy the blog! <3


Sweets
Gluten/Dairy/Egg-Free Chocolate Thins
Nutty Coconut Cookies
Peanut Butter and Jelly Bars
Oatmeal Almond Chocolate Chip Cookies
Chocolate Guinness Cake
Malibu Coconut Rum Cupcakes


Appetizers
Fruit Salsa with Baked Cinnamon-Sugar Tortilla Chips


Salads
Walnut, Pear, and Arugula Salad with Balsamic Vinaigrette
Arugula Salad with a Poached Egg and Lemon Vinaigrette


Sides
Baked Sweet Potato Fries with Lemon-Garlic Mayo
Roasted Brussels Sprouts
Wilted Kale with Baby Portobellos and a Red Wine Reduction


Vegetarian Entrées
Mom's Eggplant Parmesan

MFP
Entrées: Meat Fish & Poultry
Turkey Chili
Seared Sea Scallops with a Portobello-Truffle Emulsion
Grilled Mediterranean Chicken with Romesco Sauce
Seared Sea Scallops with a Mushroom-Dijon Emulsion


Pizzas & Pastas
Personal Pizzas


Vices
Blood Orange Martini
Strawberry Margarita Jello Shots
Lemon Drop Jello Shots


Breakfast
Whole Wheat Coconut Walnut Pancakes