This year's DYI Christmas gift of choice: cake pops! I will post a full step-by-step blog entry of how to make these tasty treats once finals are over, but I just couldn't resist posting a few pictures in the mean time. They came out so well, and were a lot of fun to make. I can't wait to give them away :)
Sunday, December 11, 2011
Saturday, December 3, 2011
Whole Wheat Blueberry Bran Muffins
Serving Size: 1 muffin
Preparation time: 15
minutes
Baking time: 15 minutes
These blueberry muffins are to die for; they are moist,
fragrant, and full of wonderful flavors. The blueberries add great texture
as well as antioxidants, so you can feel good about your health while eating
them. These step-by-step instructions will help you get through the baking process smoothly and quickly, so you will be ready to enjoy your muffins in no time!
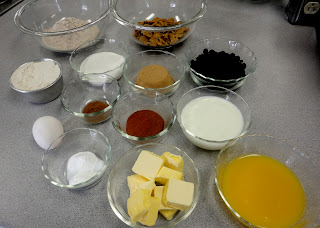
What you'll need:
Ingredients:
- 1 cup bran cereal
- ½ cup orange juice
- 1 cup whole wheat flour
- 1 cup all-purpose flour
- 1 teaspoon baking powder
- 1 teaspoon baking soda
- 1/4 teaspoon salt
- 1 tablespoon + 2 teaspoons cinnamon
- 1/2 teaspoon nutmeg
- 1/2 cup (1 stick) unsalted butter/margarine blend, softened
- 1/2 cup granulated sugar
- 1/2 cup light brown sugar, packed
- 1 large egg, at room temperature
- 3/4 cup (6 fluid ounces) buttermilk
- 1 cup dried blueberries
What to do:
Methods:
2. In a medium bowl, combine the bran flakes and orange juice. Set aside and allow to soak.
3. In a separate medium bowl, mix the whole wheat flour, all-purpose flour, baking powder, baking soda, salt, cinnamon, and nutmeg. Be sure to level-off your ingredients while measuring.
4. In an electric mixer, cream the butter/margarine blend. If you do not have a stand mixer, you may use a large bowl and a hand mixer. After creaming the butter, add in the granulated and brown sugars and mix. Once combined, add the egg and mix well. The mixture should appear creamy.
creamed butter/margarine |
butter/margarine + sugars |
butter/margarine + sugars + egg |
5. Add the flour mixture to the butter/sugar mixture, beating well. Add the buttermilk and continue mixing. Add the hydrated bran flakes/orange juice mixture and blend until smooth.
6. Using a rubber spatula, stir the dried blueberries into the mixture.
7. Distribute the batter evenly into a non-greased non-stick muffin pan (using a #20 spoon if desired).
8. Bake the muffins on the middle oven rack for 15 minutes, or until a toothpick inserted into the center of a muffin comes out clean.
9. While still in the pan, cool the muffins on a wire rack for 5 minutes. Remove the muffins from the pan and allow to cool. Serve and enjoy.
Tuesday, October 11, 2011
Adobo Sweet Potato Hash with Toasted Walnuts and Craisins
I've had a sweet potato just chilling in the pantry for a few weeks now. And every time I open up the pantry, that sweet potato has been staring me in the face, begging for attention. Well, sweet potato, tonight you finally got your wish.
I had a craving for some type of hash, but wasn't quite sure what direction to go in: savory or sweet? But then I decided, why choose between the two? This hash has texture, flavor, beautiful color, with both salty and sweet notes: AKA the perfect side dish! I'm very happy with how it came out.
What you'll need:
Serves 4-6
1 yellow onion, diced
2 medium sweet potatoes, diced to your size preference
2 tablespoons olive oil
2 teaspoons Adobo seasoning (I used a wonderful blend from a local vendor, Mill Creek Spice Company)
1/3 cup water
1/3 cup water
1/2 teaspoon kosher salt (may omit if your adobo seasoning already contains salt)
1/3 cup walnuts, roughly chopped
1/3 cup craisins
2 teaspoons agave nectar, optional
What to do:
1. In a large skillet over medium heat, saute the onion in 1/2 of the olive oil.
2. While your onions are sauteing, toss your diced sweet potatoes in a medium bowl with the remaining oil and the adobo seasoning. Add the potatoes to the skillet with the onions. Add the water. Cover the sweet potatoes with a lid, and let the sweet potatoes soften for a few minutes. This step makes sure that you don't end up eating crunchy, raw sweet potatoes, so don't skip it!
3. After your potatoes have softened a bit (not too much!) remove the lid, and increase the heat to medium-high to let your potatoes crisp. Stir frequently until potatoes are crisp, about 5-10 minutes. Add the salt and combine.
4. Add the walnuts and cook for an additional minute or so, just to toast them. Remove from heat, and add the craisins. Drizzle with agave, if a sweeter note is desired. Serve and Enjoy!
Thursday, September 22, 2011
Pumpkin Ale Cupcakes with Caramel Cream Cheese Frosting
First off: I know these are far from grain free (or even vegan, like my usual posts) but hey, not everyone is perfect. Irregardless, these cupcakes are amazing and worth every bite. I have made cupcakes using Guinness and dark chocolate in the past, and they have always turned out wonderfully. Today when I found a plethora of pumpkin-flavored products at the grocery store, including the new seasonal pumpkin wheat Shock Top, I just had to figure out something to bake. So I created this recipe to keep the beer and cupcakes theme alive through fall!
What you'll need:
(You don't actually need the coffee... but how delicious does THAT sound?) |
Makes 12 cupcakes
For the cupcakes:
- 6 oz Shock Top Pumpkin Wheat (or any other pumpkin ale)
- 1 stick butter, cubed
- 1/4 cup brown sugar
- 1 egg, room temperature
- 1/3 cup plain greek yogurt
- 1/3 cup pumpkin puree
- 1 cup all-purpose flour
- 1 cup sugar
- 1 1/2 teaspoon pumpkin pie spice
- 1/4 teaspoon salt
- 3/4 teaspoon baking soda
For the icing:
- 1 (8 oz) packet of cream cheese, softened
- 1 stick of butter, softened
- 3/4 to 1 cup confectioners sugar (you may adjust this based on your sweetness preferences)
- 1/2 teaspoon vanilla
- 1 1/2 teaspoon caramel sauce (homemade or store bought), plus extra for drizzling
- 1/2 teaspoon cinnamon, for garnishing
**For the caramel, I made my own... but it burns very easily on the stove if you aren't extremely attentive when making it, so I would recommend a store bought version.
What to do:
1. Preheat oven to 350 deg F. Line your cupcake pan with papers, or grease with oil. In a medium skillet or sauce pan, melt your butter cubes over medium heat. Add the pumpkin ale, and simmer for about 5 minutes. Remove from heat, and set aside to cool.
2. In a large bowl, combine the flour, salt, baking soda, and pumpkin pie spice. In a separate bowl with an electric mixer, beat the egg, greek yogurt, and pumpkin puree together until smooth. Add this to the butter-ale-mixture and stir.
3. Add the butter-ale mixture to the flour mixture, and beat until combined. Divide the batter evenly amongst a 12-cupcake tin. Bake for about 20 minutes or until a knife inserted into the cupcake comes out evenly.
4. While your cupcakes are baking, prepare your icing. With an electric mixer, whip the cream cheese and butter together. Add the vanilla and caramel, and mix until combined. Place in refrigerator to cool.
5. When your cupcakes are done baking, allow them to cool on a baking rack for about 20 minutes. Once your cupcakes and icing are cool, ice your cupcakes. Drizzle with caramel sauce and sprinkle with cinnamon. Enjoy!
Wednesday, September 14, 2011
Individual Cherry Pies- Grain Free and Vegan!
Lately I have been having way too much fun with grain-free flours. Today, I made individual cherry pies! These pies are grain free and vegan, and contain no processed added sugars. The best part is, I made this recipe myself (proud moment in a young chef's life)! The crust was my favorite part! I definitely recommend trying these if you've thrown grains out of your diet but still need something to soothe your sweet tooth :]
What you'll need:
The recipe can either make one regular 9.5 inch pie, or can be divided into 4 ramekins for individual pies.
For the crust:
For the filling:
For the crust:
- 1 c almond flour
- 1.2 c pecan flour
- 1/4 c coconut oil, melted
- 2 Tbsp agave nectar
- 1 1/2 tsp vanilla
- 1/4 tsp salt
For the filling:
- 4 cups pitted tart cherries (I used fresh)
- 1/3 c agave nectar
- 1 Tbsp garfava flour, for thickening
What to do:
1. Preheat oven to 325 deg F. In a medium bowl, combine the dry ingredients for the crust. In a small bowl, combine the wet ingredients. Mix the wet and dry together until they form a wet dough
2. Mold the dough into a 9.5 inch pie dish or divide amongst 4 ramekins. Press the pie crust onto the dishes, forming an even, thin layer. Bake the pie crusts for about 10 minutes, or until golden.
3. While your crust is baking, place the cherries and the agave for the filling in a small pot. Over medium low heat, cook the cherries until most of their juice secretes out. Add the garfava flour to thicken and immediately stir. Pour the mixture into your ramekins or pie dish.
4. Bake for an additional 10-15 minutes, keeping an eye on your crust to make sure it doesn't burn. Remove from oven and let cool before serving. Enjoy!!
Monday, September 12, 2011
Grain-free Tortillas with Almond Butter & Figs
What you'll need:
For 1 Tortilla:
- 1/4 c garfava flour
- 1/3 c water
- 1/4 tsp cinnamon
- 1/8 tsp salt
- 1 Tbsp almond butter
- 3 black mission figs, sliced
- oil for coating
What to do:
1. Preheat oven to 400 deg F. Coat a 8 inch round pan with oil of your choice. Place the pan in the oven for a few minutes to heat the oil.
2. Combine the garfava flour, water, cinnamon, and salt. Whisk to combine.
3. Remove the pan from the oven, and pour the batter into the pan. Bake for approximately 20 minutes, or until the crepe has solidified completely.
4. Spread a thin layer of almond butter over the tortilla, and top with the fig slices.
Enjoy!
Tuesday, August 23, 2011
Walnut-Basil Pesto
My Mom's garden is absolutely loaded with fresh basil, so I figured for my afternoon de-stress session I'd put it to good use: a walnut-basil pesto. It is very fragrant and tasty, as well as very quick and easy to make. Absolutely perfect on a slice of toasted bread or to toss some pasta in!
What you'll need:
- 2 cloves garlic
- 1 cup raw walnuts
- 3 cups fresh basil (loosely packed)
- 1/4 cup freshly grated Parmesan cheese (or omit for a dairy-free vegan option)
- 2/3 cup olive oil
- salt & pepper to taste
What to do:
1. Place the garlic cloves in a food processor and pulse till minced. Add the walnuts and pulse until finely chopped, but not ground into a powder.
2. Add the basil and pulse. Add parmesan cheese and salt and pepper, to taste. Pulse again.
3. While the food processor is on, slowly drizzle in the olive oil. The pesto with thicken and become creamy.
Serve with your favorite grain or eat with a spoon :]
2. Add the basil and pulse. Add parmesan cheese and salt and pepper, to taste. Pulse again.
3. While the food processor is on, slowly drizzle in the olive oil. The pesto with thicken and become creamy.
Serve with your favorite grain or eat with a spoon :]
Thursday, July 21, 2011
Summer Creations
Zinnias from my Mom's Garden |
But first, here's a glimpse for you to see where my inspiration and ingredients have come from this summer: my mom's beautiful garden.
So many watermelons! |
Zucchini flowers... absolutely delicious fried! |
And now for the creations:
Spiked Blackberry Ginger Coolers |
Alaskan Salmon Rolls |
Classic Caprese |
Vodka-spiked Strawberry Lemonade |
Vegan Oatmeal Cookies |
Homemade Pancakes with Fresh Blueberry Sauce |
Homemade Peaches 'N Cream Waffles |
Prosciutto Tomato & Basil Omelet |
Vegan Walnut Brownies |
Cucumber Rolls |
Many, many more to come!
Friday, June 10, 2011
Raw Coconut-Lime Cookies
My mom and I work a booth at the farmer's market here in Snellville selling a variety of baked goods, and vegetables and fruits from our garden, and it's been really fun in terms of expanding my creativity. I've been able to test out new things (some of which don't always pan out and my family members end up eating the rejects) but this was one of the recipes that I'm really happy with! These cookies are completely raw as well as grain, dairy, egg, and soy free. They are also sweetened with agave instead of added processed sugar. They are wonderfully reminiscent of a margarita, and a perfect snack you don't have to feel guilty about eating!
What you'll need:
Ingredients:
Equipment:
- Food processor
- Dehydrator
Ingredients:
- 2 c raw walnuts
- 1 c unsweetened dried coconut flakes
- 1/2 c agave nectar
- Zest of 2 limes
- Juice of 1 lime
- 1 tsp sea salt
- 2 tsp vanilla extract
What to do:
Dehydrate for about 5 hours. Then flip the cookies and dehydrate for another 5 hours. You can adjust the dehydration time by how chewy or crunchy you want your cookies.
Let the cookies cool, and then enjoy!
Not feeling up to making these yourself? Come buy a pack from me at the Snellville Farmer's Market! Saturday's from 7-12 in front of City Hall :)
Place the nuts in the freezer to chill for a few minutes. In a food processor, pulse together the walnuts, coconut, and lime zest until mixed but still chunky.
Transfer the ingredients to a medium-sized bowl, and add the remaining ingredients. Combine well. Drop tablespoon-sized scoops of the mixture onto parchment paper-lined dehydrator trays. Press the cookies down with a flat utensil (I used as a spatula) with a piece of parchment paper between the two so the batter doesn't stick.
Dehydrate for about 5 hours. Then flip the cookies and dehydrate for another 5 hours. You can adjust the dehydration time by how chewy or crunchy you want your cookies.
Let the cookies cool, and then enjoy!
Not feeling up to making these yourself? Come buy a pack from me at the Snellville Farmer's Market! Saturday's from 7-12 in front of City Hall :)
Subscribe to:
Posts (Atom)